One click release procedure on Bamboo
I would like to share in this post how to configure a Bamboo plan in such a way we can release a project in one click. I use Maven as build tool and Git as version control system (hosted on Stash).
To reach our goal we will at first create a new branch for each new release. Then in a second step, we will checkout the branch and call the Maven release plugin to perform the release.
It can be possible to use another approach with a unique release branch. In that case the plan would start with a checkout of this branch and then take (or not eventually) the changes from master.
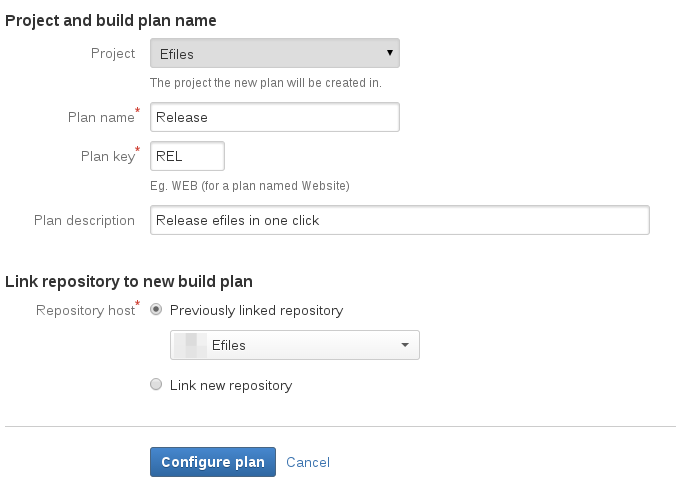
1. Setup the new plan
-
Create a new plan and select a Git repository, let say my project name is eFiles:
-
Make sure the option
Use shallow clonesis disable in the repository settings:
From this new plan we keep the default checkout task.
2. Create a git branch from bamboo
Before going forward we need Bamboo to be able to connect to the Git repo. This is different than the config we did
previously on the Repositories section. Indeed we want Bamboo itself to have permissions in read-write on the repo. The reason for that is,
Bamboo will create branches and the Maven release plugin will commit and push. To do so, we need to add the ssh key from the Bamboo machine to the Git repo on Stash.
After that we can create the branch. The only way I found to do it with Bamboo is using the script task:
git remote set-url origin ssh://git@somemachine/efiles.git
git checkout -b release/${bamboo_releaseVersion}
git push origin release/${bamboo_releaseVersion}- You can notice I explicitly set the url of the repo origin because the config file in the
.gitfolder doesn’t contain this information after the checkout task. - Then I run the cmd
git checkout -b newBranchwhich create a branch and checkout on it. The name of the branch is built from a Bamboo variable. - Finally the script push the new branch to the origin.
In order to call a variable from a script task you have to prefix it with
bamboo_and then the name of the variable. In our example the variable name isreleaseVersion.
3. Release variables
I lied to you when I said “a release procedure in one click” because you still need to specific variables before running it. I suppose it can be fully automated however I find it a bit more flexible like this. Indeed you can decide whenever you want to increment the minor version number or the major one for instance. In my case I use only two variables.
- The releaseVersion used to create the branch, to release and create the tag.
- The nextVersion used to set the next development version (SNAPSHOT).

4. Maven release plugin
To do the release itself, I use the maven release plugin - all the magic happens there. You can create a new Maven task. I run a goal more or less similar to this one.
release:prepare
release:perform
-DreleaseProfiles=prod
-DautoVersionSubmodules=true
-DdevelopmentVersion=${bamboo.nextVersion}
-DreleaseVersion=${bamboo.releaseVersion}
-Dtag=${bamboo.releaseVersion}
The goal contains actually only one command, one line.
To call the maven release plugin you have to call the command release:prepare release:perform. These commands can take parameters:
- releaseProfiles: it doesn’t work to use -P to set a profile, the only way is to use this parameter. You can pass more than one profile.
- autoVersionSubmodules: in my case I have sub-projects but I want them all with the same version. By default this option is false.
- developmentVersion: the next snapshot version. I use the Bamboo variable, you can see the prefix
bamboo.to get the variable in opposition to thebamboo_in the script task. - releaseVersion: to set the version of the release.
- tag: name of the tag created
I didn’t need to able the batch mode here because Bamboo do it by default.
5. Maven pom
For the release plugin to work and the deploy to be done on your Maven artifact repository you need to provide into your pom with these information. Of course you should replace with real values:
<distributionManagement>
  <repository>
    <id>releases</id>
    <name>Internal Release Repository</name>
    <url>https://yourrepo/releases</url>
  </repository>
  <snapshotRepository>
    <id>snapshots</id>
    <uniqueVersion>false</uniqueVersion>
    <name>Internal Snapshot Repository</name>
    <url>https://yourrepo/snapshots</url>
  </snapshotRepository>
</distributionManagement>

<scm>
  <developerConnection>scm:git:ssh://git@yourrepo/project.git</developerConnection>
  <connection>scm:git:ssh://git@yourrepo/project.git</connection>
  <url>https://yourrepourl/project</url>
  <tag>HEAD</tag>
  </scm>
6. Useful Tips
- If you created “by mistake” some tags, you can get ride of them running these commands:
git tag -d taganme
git push origin :refs/tags/tagname- During the phase of setting up the plan and trying the maven release plugin, you can use the option
-DdryRunsuch that no changes will be apply:
release:prepare
release:perform
-DreleaseProfiles=prod
-DautoVersionSubmodules=true
-DdevelopmentVersion=${bamboo.nextVersion}
-DreleaseVersion=${bamboo.releaseVersion}
-Dtag=${bamboo.releaseVersion}
-DdryRun- I got trouble with an old version of the release plugin The problem was the plugin could not commit and the logs were silent about it. To fix it I had to set explicitly a newer version for this plugin.
7. To go further
There is actually an issue with this plan. In fact if you find a bug in your release and you don’t want to merge on master yet - Then this plan won’t work because each time a new branch is created from master. I am still working on a better solution however you’ve got good basis to play on your own and you can still create a second plan when fixing a release.